Thursday, May 9, 2024

I'm typing with both hands now! Things are going well and I'm pretty happy so far.

Per instructions given to me, I could not take wet showers because contaminants might get into the wounds. Earlier this week I went back for a pre-scheduled PO check and the doctor removed the first dressing, cleaned the bloody surfaces, and reapplied fresh clean dressings (see below). Things looked good, and I felt pretty good as well. And the first thing I did when I got home was to take a real shower, and boy, it felt good! Overall, it's been a positive experience so far -- no complications and manageable pains.

As for the post-op pics below, it's really funny that they marked my upper body all over with bold identifiers. During pre-op, the nurses kept asking me to confirm my name, birthday, and triple confirmed the correct side to perform the surgery on -- just in case!


At the PO clinic I learned a few medical terms. The repairing of the labrum was done by inserting screw anchors to the bone, and tying them around to stabilize it (Bankart procedure). It was explained to me that in time, my own tissues would grow around and strengthen parts to keep the labrum and scapula stronger (months). It's imperative that I don't stress the bones/muscles/tendons in order for the tissues to grow back properly. See the illustrations below:


During the procedure, Dr. Eklund also noticed more problems that were not clear from the CTs and decided to perform an additional procedure called "remplissage". This is a procedure that stabilizes recurrent anterior shoulder dislocations, by filling in a medium sized Hill-Sachs region in the humeral head caused by  prior dislocation traumas. Below is an illustration of the Hill-Sachs lesion (trauma areas) and repositioning of the infraspinatus tendon into the Hill-Sachs area, effectively "filling in" to prevent it from engaging with the glenoid (shoulder socket) during shoulder movement.
In total, Dr. Eklund inserted 6 1.8mm anchors + "knotless" sutures for Bankart lesions, and 2 (bigger) anchors for the Hill-Sachs lesions.

This is my second week, and pain is now manageable without opiates, when I use ice-packs intermittently. I'd like to avoid hydrocodone (opiate) because it works all TOO well -- it has a tendency to  make me feel invincible and want to move around, which is not a good thing when I am suppose to rest and heal.

Thursday, May 2, 2024

Today is the 2nd day of surgery. I'm feeling good enough to type now, albeit veeerrry sloooowly.

The first day was uneventful. I checked in at 6:30am. There were some pre-op checks and questionnaires and forms to sign. The anesthesiologist put me to sleep around 7:50am. I woke up around 11:30am, but barely able to think or talk. Pam was already here but I couldn't walk (I was too nauseated/dizzy) and it took a looong time to get into the car-- I don't remember the details but I was half dozing off and trying to get out of the wheel chair. I slept through half of the day. I didn't fully awake and drink water and walk around until late in the afternoon.

The funny thing about the surgery is that post-op, I didn't feel any pain at all. Zero -- NADA! And besides feeling tired and somewhat nauseated, I actually felt carefree and a bit happy. It was probably the opiates working all too well. Later at night, I started to feel more and more pain until I decided to take Hydrocodone (opiate) that I picked up the day before the surgery. First 48-72 hours -- pain management is utmost important.

Back to day 1: when I was asleep, Dr. Eklund told Pam that it went well, and everything else will just depend on post-op care. It's now day 2, and I am hoping that with good PT and some time to heal, I'll be good very soon. I can't wait to play tennis, biking, & skiing with my kid. And of course, I can't wait to get out of the house and start working again!


Below are some pictures from the scope. You can see the instrumentations drilling in for labral repairs, etc/aka capsular plication). High tech stuff -- I love it!


Friday, April 12, 2024

Scope shoulder capsulorrhaphy procedures

Insurance just approved the procedure and my surgery with Dr. Eklund (sports injury surgeon) is scheduled. Admittedly, I'm a bit anxious and I'm currently trying to read up as much about it as I can. Realistically there's not much else for me to do but to just rest and heal, but it's always nice to know the details. 

There are a couple types of capsulorrhaphy procedures that can be performed: 
  1. Capsular Shift: In this technique, the surgeon tightens the loose or stretched tissues of the shoulder capsule by folding and overlapping them, effectively reducing the size of the capsule and improving joint stability. 
  2. Capsular Plication: This involves the use of sutures or anchors to gather and cinch together the loose or redundant tissues of the shoulder capsule, similar to taking in excess fabric when tailoring clothing. 
  3. Capsular Reconstruction: In cases of severe shoulder instability or extensive capsular damage, the surgeon may perform a capsular reconstruction using tissue grafts or synthetic materials to reinforce and strengthen the shoulder capsule. 
After capsulorraphy surgery, patients will usually be allowed to go home the same day. After surgery, you will be monitored closely and given pain medication to keep you comfortable. You will also be given a sling to wear and instructions on how to care for your incisions. It is important to follow these instructions carefully to ensure proper healing. Recovery from capsulorraphy surgery takes time, but most people are able to return to their normal activities within four to six months.


Monday, April 1, 2024

Ski accident

April 2, 2024: somebody pointed out that I posted this on April 1. As much as I wished that it was just an April Fools prank, unfortunately, this is real 😢.

April 1, 2024: I'm typing this 1 handed and under painkillers so forgive me for typos and or mistakes. I typically ski on the green slopes but I've been trying to learn on the easy blues lately. On the last day of our vacation, my son took me to this blue run. Apparently this blue run we was quite icy and very narrow and after failing to negotiate the turns and slowing down, I slipped and went down at about 20-25MPH. The skis popped out, and I started tumbling down and eventually stopped on my back. That's when I realized that my right shoulder dislocated in a very awkward position, and I couldn't move it at all (although, I still had finger sensations, which was a good sign). My son called in for help and 2 ski patrols put me on the sled and went down to the slopes. The ambulance brought me to the Truckee Hospital (20 min away), and after few failed attempts of "shoulder reduction" procedure, the surgeon decided to put me to sleep so that my muscle spasms would not interfere with the procedures. When I woke up the surgeon explained to me that the X-rays showed fractures and that I needed a follow up at my local hospital. I went home, painless, thinking I was going to be just fine. Later on, as the pain-killer wore off, I felt awful and was literally crying for pain killers! Below is a composite CT (they stitched CTs to make a 3D render) taken a few days after the accident:
Below is an X-ray which shows an old staple on my arm -- the staple was from a childhood sports injury many decades ago. The arrow is what the surgeon thinks is a fracture on the scapula (shoulder blade).
Lastly, the MRI scan (showing swollen soft tissues/liquids/etc)
As long as I'm on an arm immobilizer I am ok, but obviously I can't (and shouldn't) move my right arm up and to the side. The earliest surgery date is May, and the surgeon says I need to take off AT MINIMUM 3 weeks, and possibly up to 6 weeks, for me to resume normal activities. For sports, he recommends waiting at least 6-9 months + consistent PT time before I start doing anything more strenuous.

I'm mentally ready for all the challenges ahead but my body is not. Or at least, not yet. I shall be back!

Sunday, October 8, 2023

Optimizing the vacuum adapter

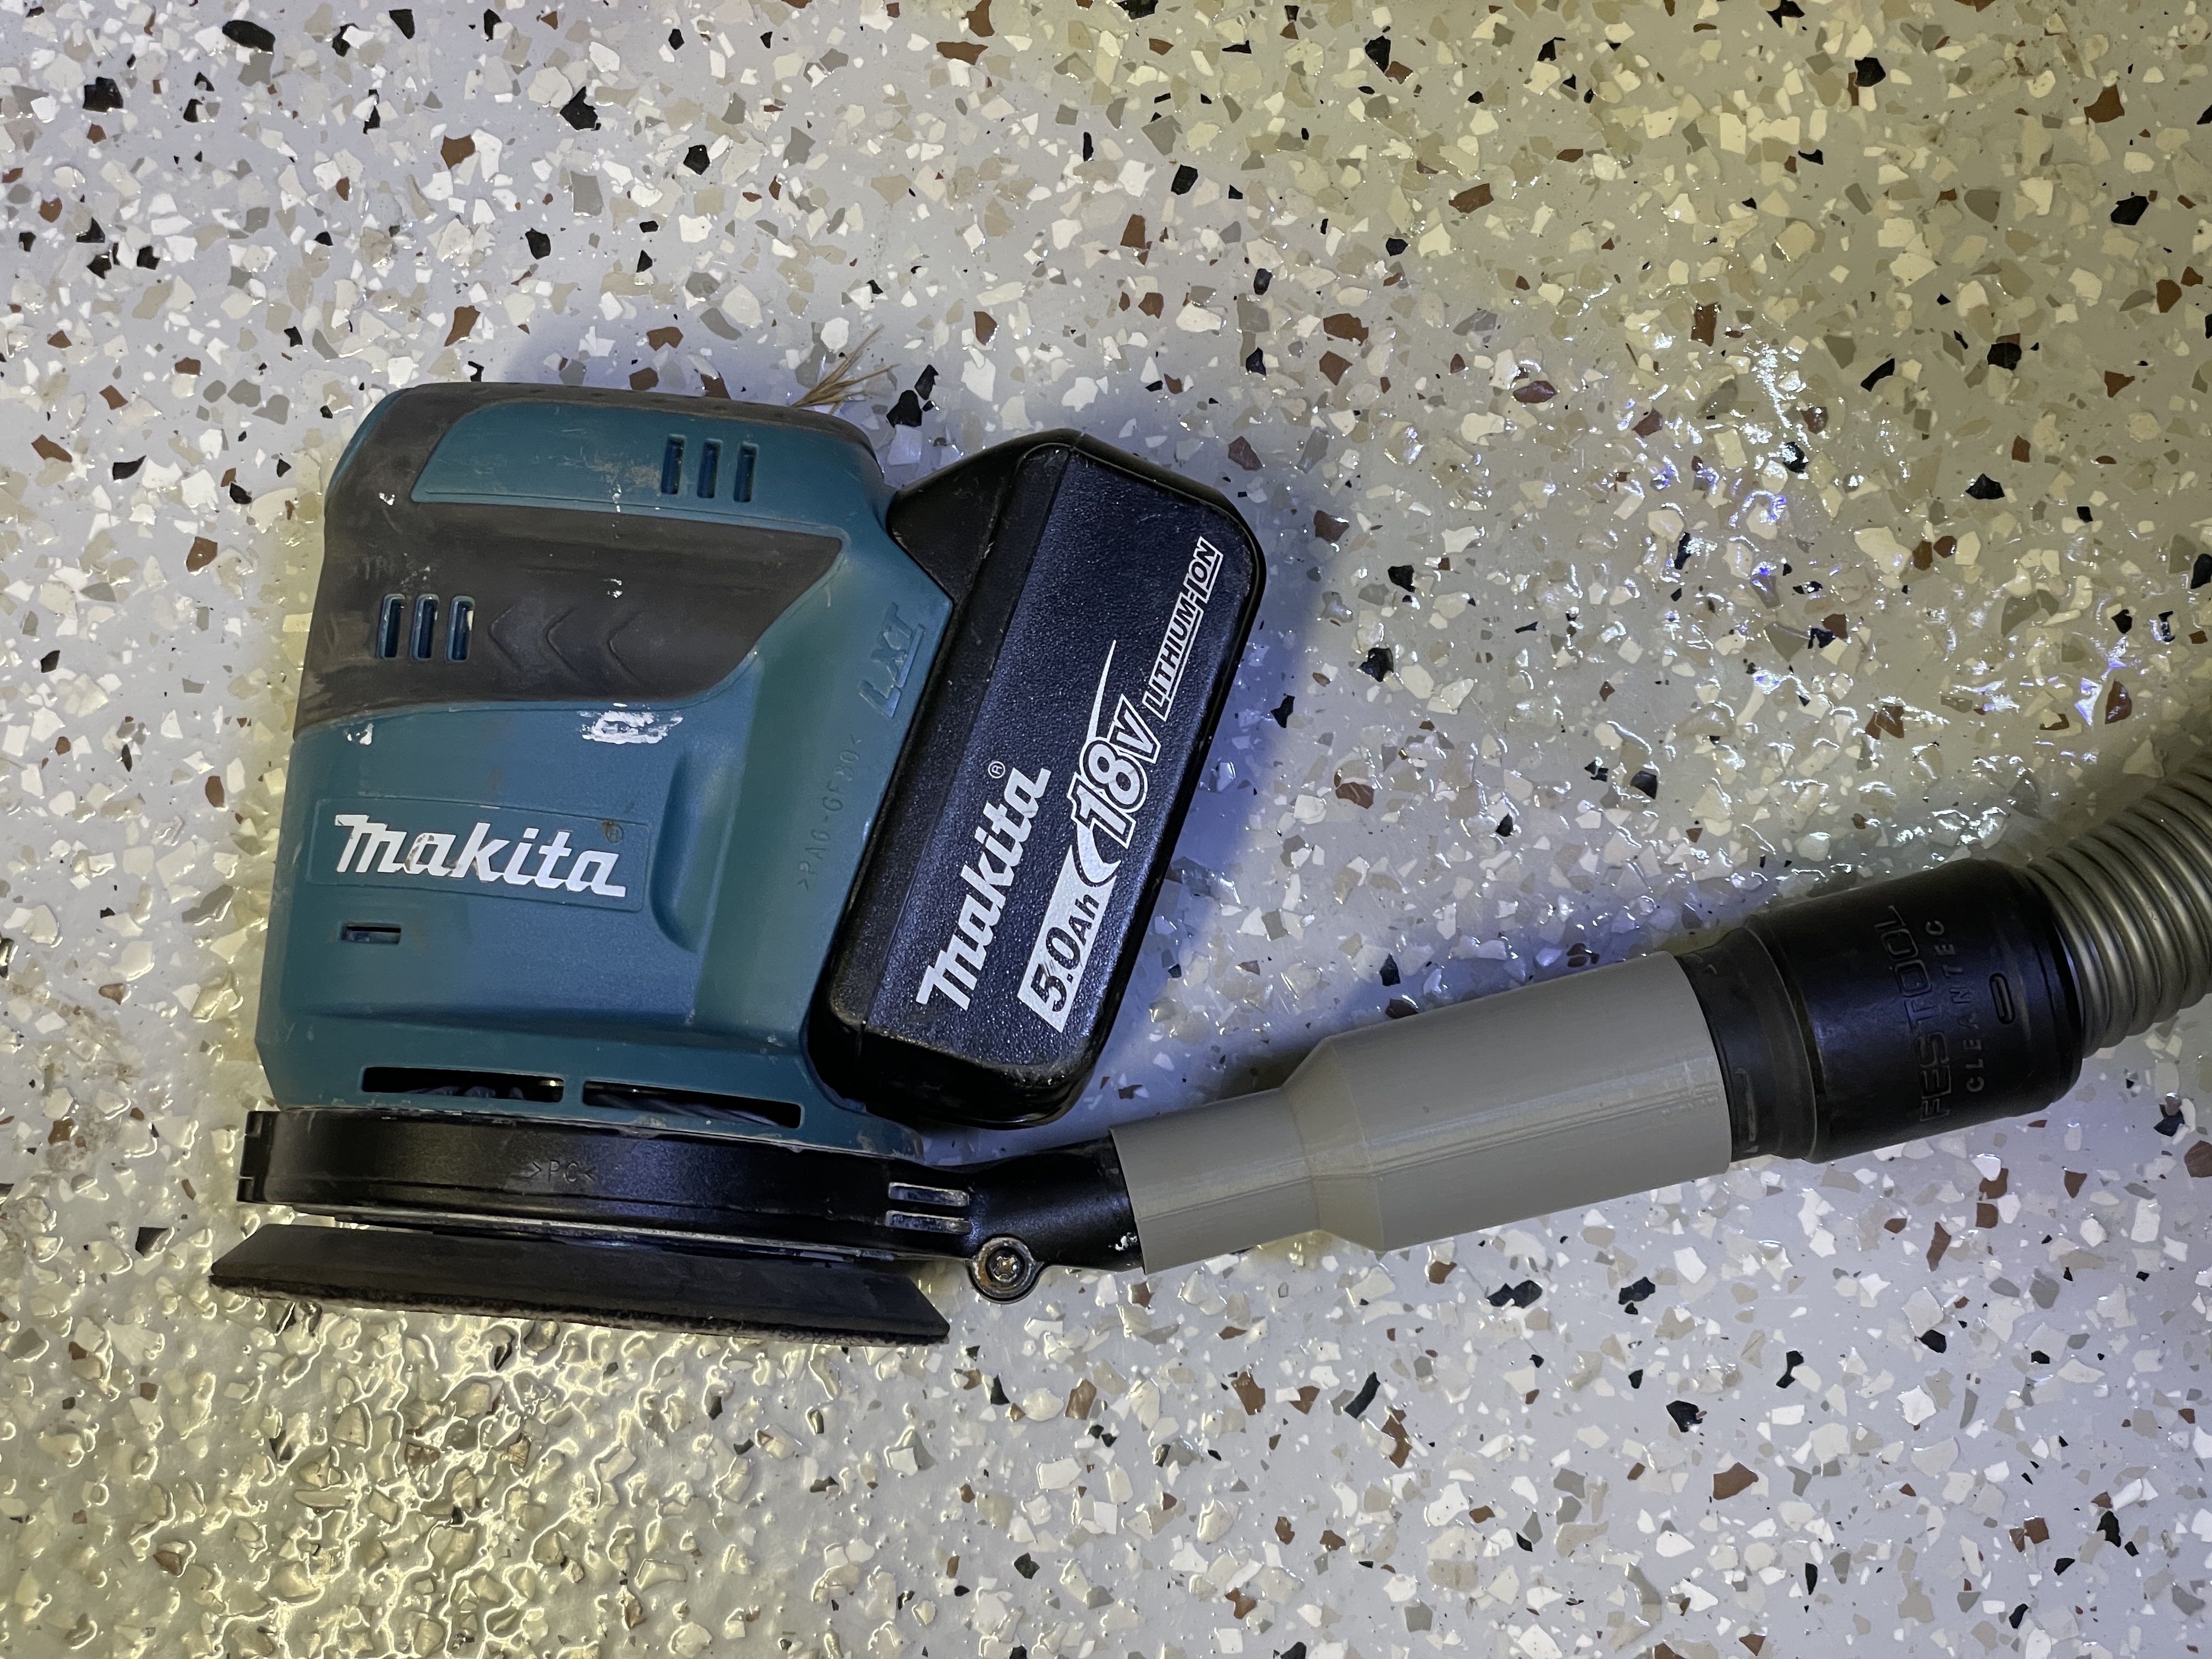
Both of my Makita jigsaw and Makita sander have the same sized vacuum suction nozzles, and I use them quite a bit. The cheap Makita sander kicks up a lot of dust and short of buying another premium near-dustless sander for $500 (e.g. the 3M Xtract), I decided to just hook it up to my Festool Vacuum. I tried various universal adapters but none of them were to my likings, so I decided to custom design and 3D print my own. I went through several iterations and finalized on the smallest/lightest version. Below is my first version
This first version is a nice fitting test on the tubes. However, it's pretty long and clunky to use, so I designed another version where the vacuum length is reduced.
Picture to the left is the initial version, progressing to the right: I kept reducing the excess adapter size and at some point, I made the realization that Makita's smaller nozzle's outer diameter could simply fit inside the inner diameter of the Festool vacuum line:
Finally,
This is the final version, which is the lightest and easiest to work in tight spots due to the short length of the adapter:
In retrospect, it should have been pretty obvious to design the optimal adapter from the very beginning -- the outer diameter of the smaller nozzle fits inside the inner diameter of the vacuum tube. Hindsight!

Monday, April 4, 2022

Cub Scout Pack 415

Our boys are on their last year in the Cub Scout and "bridging" to the Boy Scouts. John our Den 3 Leader asked me to build a candle holder. After looking at some examples online, I built one, using all hand power tools (jigsaw, random orbit sander, drill, and trim-router). I made the whole thing out of a solid 2x8" block of wood. It was very fun to make, and I hope it will last for many years to come as I'm donating the candle holder to Pack 415. Below is a picture I downloaded online. It looks like a candle holder with 1/2" holes on top for 1/2" candles. However, since John already had a bunch of 7/8" candles, I decided to change the design such that the candles would go BEHIND the arrow:

Here is work in progress (I already jigsawed the 2x8" lumber):
Here's one way to use the holder (7/8" candle mode):
Here's another way to use the holder (1/2" candle mode. The pencils are simulated 1/2" candles):

Thursday, August 19, 2021

Building a 2021 PC

This blog is an attempt to jot down a whole week's worth of my time spent on researching/buying/building a new PC. If you're thinking of building your own PC, reading this may or may not save you some time/money.

It's been almost 10 years since I built a new PC. I switched exclusively to Apple hardware about a decade ago for several reasons. Being a dad, I didn't have much time to tinker with PCs and I needed something that "just works" at all cost. Fast forward 10 years, I now have a bit more time. Also, I'd like to show my kid the joy of having a powerful desktop by showing him some cool stuff like VR, MS Flight Simulator, etc. Besides, my 2017 Macbook Pro is starting to be annoyingly slow even for simple operations like Lightroom, Photoshop, and family video editing.

Instead of buying an expensive new Macbook Pro every few years, the intent of building my own PC is to know exactly what I'm buying so that I can expand it in a few years and make it last at least a decade. I don't want to buy a typical pre-built PC because they tend to come with cheap parts, RAM slots all pre-filled, lack motherboard documentations, and or comes with cheap motherboards that don't allow you to upgrade to newer generations of processors. Regarding processors, I decided to go with AMD's Ryzen series because of its superb performance/price ratio and that the AMD socket types (e.g. AM4 socket) is very very stable year after year. In contrast, Intel seems to come out with a new socket type every year, or something like that, which really turns me off because it precludes the possibility of upgrading newer processors with an older motherboard. No Intel, no messy LGAs. AMD all the way this time.

Below are the other parts I used. I've put links to Amazon.com and the prices at the time of writing (2021-08-19). Note that you may be able to get cheaper prices from eBay, new or old.
To start off, there are a few resources that are invaluable when picking out what parts you want. I used userbenchmark.com (click on Compare). It's a really great tool that shows you a wealth of information. I originally eyed the top of the line Ryzen 9 5950x 16 core 32 threads ($800), but eventually bought the Ryzen 7 5800x 8 core 16 threads449 $393 at the time of writing. 8 cores (16 threads) should be sufficient because anything more than 6 cores would (usually) not give you much boost in games, but 8 cores is sufficient to run 4k video editing + encoding for at least 5 years in the future. Besides, when Ryzen 5950x becomes really cheap eventually on eBay, there will be room to upgrade to 16 cores (32 threads).

There is a plethora of motherboards to choose from. My go-to choice is ASUS due to their superb history of compatibility and stability, plus it is the only vendor with 3 years of warranty. There are also great choices at lower prices from Gigabyte, AsRock, MSI, etc etc (all with 1 year warranty). However, this is an area where I'm willing to pay a bit more for name-brand so that I don't have to deal with finicky settings and unreliable motherboards (from bad past experiences). For AMD AM4 socket there are some chipsets you can go with. The latest and greatest one is X570 that has 100% PCIe v4 interfaces for multiple high end GPUs. But, they cost quite a bit more ($300-$500). So instead I got one grade lower, the B550 chipset, which is mostly PCIe v4 except one slot is v3-- this is perfectly fine since I only plan to add just 1 GPU for gaming. The one I got is Asus B550-F Motherboard ATX Wifi$210 $200 at the time of writing. The "rule of thumb" on how much to spend on motherboard is that a decent motherboard will cost about 1/2 the cost of the CPU (plus minus a little bit).

  • RAM: Corsair Vengeance LPX 2x32GB DDR4 3600 $400 at the time of writing. Yes it's possible to buy 4x16GB 3200 for a much much lower price, but in a few years when I upgrade, I would need to sell all of them on eBay (at almost nothing) to buy 4x32GB modules. So this is an area where I decided to spend a bit more on name brand and on fewer modules, for future expansion to 128GB.
  • HD: Western Digital SN850 1TB drive 7000MB/s M.2. I used userbenchmarks.com to look for specs. This is faster than Samsung 980 NVMe Pro M.2 for just a little bit more cost. I need as much IO as I can get for photo/video editing. Because this is name brand, it cost a bit more-- $200 at the time of writing.
  • CPU cooling: $65 $60 at the time of writing. Scythe Ninja 5 quiet silent cooling This is near silent as it runs at 800RPM and is less than 10dB. The down side is that it is HUGE so make sure it fits in your full sized ATX case. Check out pcpartpicker.com, a great site that helps you look for the right cooler.
  • Power: Corsair RM850 gold power $134 at the time of writing. There are some great web sites out there to calculate how much power you need. I used this one: http://www.powersupplycalculator.net/ -- I put in the above components + 2 GPUs (future expansion possibility) and multiplied the power by 1.5x to get below 850W, which is a safe margin. You can check out YouTube videos spend hours and hours on this topic.
  • GPU: This is a very personal choice. You can find plenty of used GPUs on eBay. Anything Nvidia GTX 1080 should be a decent choice. The RTX 3070+ are ridiculously expensive right now due to shortages, so I would wait to get new RTXs later.
  • Case: Corsair 110Q quiet case $100 at the time of writing. This is not a fancy see through case, but it is a quiet case with extra sound paddings inside. No pretty light, nothing. Function over form for me.
  • Bluray/DVD read/writer
  • OS: Windows 10 Home
  • Adobe Photoshop Elements and Premiere Elements photo and video editors
This whole thing comes out to be about $1700. I could have saved a couple hundred dollars by buying cheaper brands/parts but I wanted this machine to last at least 10 years and have room for expansion, so I got premium brands.
Out of curiosity, I checked how much the equivalent Mac Pro would cost, and this is what I got:
$6700 for an 8 core Xeon 48GB 1TB machine. I know this is an apple and orange comparison -- MacOS is a real UNIX that is really stable/reliable with really good support and same Adobe softwares (and probably better, since it's more stable). I guess I wouldn't mind buying the Mac Pro if I was somebody who owns a mansion and drives a McLaren :)